Nov 29, 2011

The Java Persistence for SINGLE_TABLE inheritance type strategy


Suppose we have  an application where we need to create a User Entity for User credentials. But as per each department concerned we need to have different types of Entities. Like we have ADMIN_USER, CUSTOMER, HRM, ACCOUNTANT, LOGISTICS and so on. So, instead of just adding an attribute manually is not the case when you use inheritance. In that case you just need to create a Parent Class and the types of users' entities.

Here are the example below how you need to do this:


@Entity

@Inheritance(strategy = InheritanceType.SINGLE_TABLE)

@DiscriminatorColumn(name = "type", discriminatorType = DiscriminatorType.STRING)

@Table(name = "user")

public class User implements UserDetails {

         @Id

         @GeneratedValue(generator = "userseq")

         @SequenceGenerator(name = "userseq", sequenceName = "userid_seq", allocationSize = 1)

          private int id;


          private String username;

          private String password;


          //Getters and Setters method

}


Now, say we need to create a new user type named "customer". So, we need to create an Entity like this:


@Entity

@DiscriminatorValue("customer")

public class Customer extends User {

}


@Entity

@DiscriminatorValue("admin")

public class Admin extends User {

}


So, automatically in the database one table will be created and along with the id, username and password one additional column will be created named "type" because we defined DiscriminatorColumn and whose name is "type". So, whenever we need to create a "customer" type user just instantiate an object like this way:


User customer = new Customer();

customer.setUsername("");

customer.setPassword("");

customerService.save(customer);


That will directly create a "customer" typed user in the Object as well as "user" table.

----- Hossain Doula

Jul 3, 2011

Android get phone contacts

I'll demonstrate Android get phone contacts example. First create a new Android project in Eclipse . Then in your created xml layout just define the following things:


Just add the following codes to your Activity class:
public class ContactFetchActivity extends Activity {
    /** Called when the activity is first created. */
    @Override
    public void onCreate(Bundle savedInstanceState) {
        super.onCreate(savedInstanceState);
        setContentView(R.layout.main);
        Button contactButton = (Button)findViewById(R.id.button1);
        
  contactButton.setOnClickListener(l);
    }
    
    OnClickListener l = new OnClickListener(){

  @Override
  public void onClick(View arg0) {
   try{
    Uri contactData = ContactsContract.Contacts.CONTENT_URI;
    Cursor contactsCursor = managedQuery(contactData,null, null, null, null);
    Log.i("The first one ", ""+ contactsCursor.getCount());
    while (contactsCursor.moveToNext()) {
     String id = contactsCursor.getString(contactsCursor.getColumnIndexOrThrow(ContactsContract.Contacts._ID));
     String name = contactsCursor.getString(contactsCursor.getColumnIndexOrThrow(ContactsContract.Contacts.DISPLAY_NAME));
     String hasPhoneNumber = contactsCursor.getString(contactsCursor.getColumnIndexOrThrow(ContactsContract.Contacts.HAS_PHONE_NUMBER));
     Toast.makeText(ContactFetchActivity.this, Integer.parseInt(hasPhoneNumber) + "", 11).show();
     if (Integer.parseInt(hasPhoneNumber) > 0) {
      Uri myPhoneUri = Uri.withAppendedPath(ContactsContract.CommonDataKinds.Phone.CONTENT_URI, id);
      Cursor phones = getContentResolver().query(ContactsContract.CommonDataKinds.Phone.CONTENT_URI, null,ContactsContract.CommonDataKinds.Phone.CONTACT_ID +" = "+ id,null, null);
      String phoneNumber = null;
      while (phones.moveToNext()) {
       phoneNumber = phones.getString(phones.getColumnIndex(ContactsContract.CommonDataKinds.Phone.NUMBER));
       Toast.makeText(ContactFetchActivity.this, phoneNumber , 20).show();
      }
      Toast.makeText(ContactFetchActivity.this, id + "-----" + name , 20).show();
     }
     
    }
   }catch(Exception ex){
    Toast.makeText(ContactFetchActivity.this, "Problem because " + ex.getMessage(), 10).show();
   }
   //Uri myPerson = ContentUris.withAppendedId(contentUri, id)
  }
    };
}
Just fix your imports. And then finally on your AndroidManifest.xml file add the line:
Hossain Doula

Spring MVC JSON example

One of the person was asking me to post a Spring MVC JSON example in stackoverflow. I am demonstrating only the code on the fly, not in formal way.

public ModelAndView JsonExample(HttpServletRequest request,
   HttpServletResponse response) throws Exception {

  HashMap  map = new HashMap ();
  String pattern = request.getParameter("tag");
  ArrayList < Map < String , Object > > list = distributorService.getCustomerList();
  

  if (pattern != null && !pattern.equalsIgnoreCase("")) {
   ArrayList < Map < String , Object > > list1 = new ArrayList < Map < String , Object > >();
   for (int i = 0; i < list.size(); i++) {
    
    
    if ((((String) list.get(i).get("caption")).toLowerCase()).contains(pattern.toLowerCase()))
     list1.add(list.get(i));
    
   }
   map.put("customerList", list1);

  } else {
   map.put("customerList", null);

  }
  

  return new ModelAndView(new JSONView(), map);
 }
And then create a service interface and implement that interface:
public ArrayList < Map < String , Object > > getCustomerList(){
  List list = distributorDao.getCustomerList();
  ArrayList < Map < String , Object > > listN = new ArrayList < Map < String , Object > >();
  Map < String , Object > info =null;
  String type="";
  
  for(int i = 0;i < list.size();i++){
   info = new HashMap < String , Object >();
   Object[] obj = (Object[]) list.get(i);
   info.put("value", obj[0]);
   info.put("caption", obj[1]);
   listN.add(info);
  }
  return listN;
 }
And later add the DAO interface and implement that:
public List getCustomerList(){

  String queryStr = "select customerid,customer_name from customer_tbl";
  Session session = hibernateTemplate.getSessionFactory().getCurrentSession();
  Query query = session.createSQLQuery(queryStr);
  List list = query.list();
  
  return list;
 }


--- Hossain Doula

Jun 21, 2011

Android Facebook Tutorial

Here I am going to show you how to connect and post to facebook wall by android code. First of all just go to https://github.com/facebook/facebook-android-sdk and click the downloads button to download facebook android sdk. A zipped version will be downloaded within no time. Now open Eclipse IDE to follow the steps below:
Create a new project as Android for the Facebook SDK to add this as a library later. (File > New > Android Project)

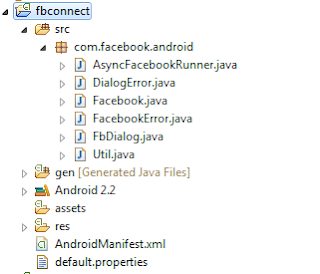
Then just click the "Create project from existing source" and then import the facebook folder or type that location in the location textbox. And after that select the Target Name (Such as Android 2.2). And then click finish.


After that you can in your "Package Explorer" something like this. And by expanding the "src" nodes you can see that there are "java" classes available from the facebook sdk.


After that, you need to create an Application (Android Project). Here you can test the whole process of facebook connectivity from Android device or Emulator to be more specific. (File > New > Android Proect) or just click the first icon below the "File" menu.


Complete your project creation like this:

After that from the newly created Project go to the src and create a new Java Class under "com.fbtest.app" package named "FacebookActivity".

Now you have two Project. The Facebook sdk project is going to be made a library. So for that just do this step by step.

You have to export the application as a JAR file to use in the next Application you have just created.

 Do this as I have depicted the procedure like the screen-shots.


 No need to add the files shown in the right pane.

Do this same as the screen-shot instructed.


Complete this like this.

Now for the new application you have to do these:


After doing same as like those above picture your project will be ready for Facebook Application integration.
So open your "FacebookActivity" class and add the following lines:

public abstract class FacebookActivity extends Activity {
    public static final String TAG = "FACEBOOK";
    private Facebook mFacebook;
    public static final String APP_ID = "71395118351"; //the API Key for your Facebook APPs
    private AsyncFacebookRunner mAsyncRunner;
    private static final String[] PERMS = new String[] { "publish_stream" };
    private SharedPreferences sharedPrefs;
    private Context mContext;

    private TextView username;
    private ProgressBar pb;

    public void setConnection() {
            mContext = this;
            mFacebook = new Facebook(APP_ID);
            mAsyncRunner = new AsyncFacebookRunner(mFacebook);
    }

    public void getID(TextView txtUserName, ProgressBar progbar) {
            username = txtUserName;
            pb = progbar;
            if (isSession()) {
                    Log.d(TAG, "sessionValid");
                    mAsyncRunner.request("me", new IDRequestListener());
            } else {
                    // no logged in, so relogin
                    Log.d(TAG, "sessionNOTValid, relogin");
                    mFacebook.authorize(this, PERMS, new LoginDialogListener());
            }
    }

    public boolean isSession() {
            sharedPrefs = PreferenceManager.getDefaultSharedPreferences(mContext);
            String access_token = sharedPrefs.getString("access_token", "x");
            Long expires = sharedPrefs.getLong("access_expires", -1);
            Log.d(TAG, access_token);

            if (access_token != null && expires != -1) {
                    mFacebook.setAccessToken(access_token);
                    mFacebook.setAccessExpires(expires);
            }
            return mFacebook.isSessionValid();
    }

    private class LoginDialogListener implements DialogListener {

            @Override
            public void onComplete(Bundle values) {
                    Log.d(TAG, "LoginONComplete");
                    String token = mFacebook.getAccessToken();
                    long token_expires = mFacebook.getAccessExpires();
                    Log.d(TAG, "AccessToken: " + token);
                    Log.d(TAG, "AccessExpires: " + token_expires);
                    sharedPrefs = PreferenceManager
                                    .getDefaultSharedPreferences(mContext);
                    sharedPrefs.edit().putLong("access_expires", token_expires)
                                    .commit();
                    sharedPrefs.edit().putString("access_token", token).commit();
                    mAsyncRunner.request("me", new IDRequestListener());
            }

            @Override
            public void onFacebookError(FacebookError e) {
                    Log.d(TAG, "FacebookError: " + e.getMessage());
            }

            @Override
            public void onError(DialogError e) {
                    Log.d(TAG, "Error: " + e.getMessage());
            }

            @Override
            public void onCancel() {
                    Log.d(TAG, "OnCancel");
            }
    }

    private class IDRequestListener implements RequestListener {

            @Override
            public void onComplete(String response, Object state) {
                    try {
                            Log.d(TAG, "IDRequestONComplete");
                            Log.d(TAG, "Response: " + response.toString());
                            JSONObject json = Util.parseJson(response);

                            final String id = json.getString("id");
                            final String name = json.getString("name");
                            FacebookActivity.this.runOnUiThread(new Runnable() {
                                    public void run() {
                                            username.setText("Welcome: " + name+"\n ID: "+id);
                                            pb.setVisibility(ProgressBar.GONE);

                                    }
                            });
                    } catch (JSONException e) {
                            Log.d(TAG, "JSONException: " + e.getMessage());
                    } catch (FacebookError e) {
                            Log.d(TAG, "FacebookError: " + e.getMessage());
                    }
            }

            @Override
            public void onIOException(IOException e, Object state) {
                    Log.d(TAG, "IOException: " + e.getMessage());
            }

            @Override
            public void onFileNotFoundException(FileNotFoundException e,
                            Object state) {
                    Log.d(TAG, "FileNotFoundException: " + e.getMessage());
            }

            @Override
            public void onMalformedURLException(MalformedURLException e,
                            Object state) {
                    Log.d(TAG, "MalformedURLException: " + e.getMessage());
            }

            @Override
            public void onFacebookError(FacebookError e, Object state) {
                    Log.d(TAG, "FacebookError: " + e.getMessage());
            }

    }

    @Override
    protected void onActivityResult(int requestCode, int resultCode, Intent data) {
            mFacebook.authorizeCallback(requestCode, resultCode, data);
    }
    
    public void postOnWall(String msg) {
        Log.d("Tests graph API %%%%%$$$$%%%", msg);
         try {
                String response = mFacebook.request("me");
                Bundle parameters = new Bundle();
                parameters.putString("message", msg);
                parameters.putString("description", "test test test");
                response = mFacebook.request("me/feed", parameters, 
                        "POST");
                Log.d("Tests", "got response: " + response);
                if (response == null || response.equals("") || 
                        response.equals("false")) {
                   Log.v("Error", "Blank response");
                }
         } catch(Exception e) {
             e.printStackTrace();
         }
    }
}

Don't forget to fix imports. The add the MainActivity  from where you will call the "FacebookActivity" class.
public class MainActivity extends FacebookActivity {
    /** Called when the activity is first created. */
 private TextView txtUserName;
    private ProgressBar pbLogin;
    private Button btnLogin;
    private Button btnWall;
 @Override
    public void onCreate(Bundle savedInstanceState) {
        super.onCreate(savedInstanceState);
        setContentView(R.layout.main);
       
        txtUserName = (TextView) findViewById(R.id.textFacebook);
        pbLogin = (ProgressBar) findViewById(R.id.progressLogin);
        btnLogin = (Button) findViewById(R.id.buttonLogin);
        btnWall = (Button) findViewById(R.id.buttonWall);
        
  btnLogin.setOnClickListener(listener);
  btnWall.setOnClickListener(listener1);
    }
 
 OnClickListener listener = new OnClickListener(){

  @Override
  public void onClick(View v) {   // 
   pbLogin.setVisibility(ProgressBar.VISIBLE);
         setConnection();
         getID(txtUserName, pbLogin);
  }
  
 };
 
 OnClickListener listener1 = new OnClickListener(){

  @Override
  public void onClick(View v) {   // 
   postOnWall("Testing from Android");
  }
  
 };
 
}
For your Facebook Apps just create the Apps from the site and follow the steps depicted below:


Put the hash key generated after providing password for the keystore in the Facebook Apps hash key textfield. So use this cygwin if your OS is windows for generating facebook android hash key. Otherwise if your OS is linux you can easily generate the facebook android hash key from terminal.

 And run the Android Application in emulator or create an APK and install to your favorite device. You have to allow access for that particular Facebook Apps.

Jun 19, 2011

Android Grid Border

For who are just searching for a GridView type actually to be more specific dynamic GridView type example in android I will show you how to do it by drawing a Canvas and put it with awesome look and feel. Here is the code:
public class CustomeTblLayout extends TextView{
 public CustomeTblLayout(Context context, AttributeSet attrs) {
  super(context, attrs);
 }
 @Override
 public void onDraw(Canvas canvas){
  canvas.drawColor(Color.WHITE);
  Paint mLinePaint = new Paint();
  Paint mMarginPaint = new Paint();
  canvas.drawLine(0, getMeasuredHeight(), getMeasuredWidth(), getMeasuredHeight(), mLinePaint);
  canvas.drawLine(15, 0, 15, getMeasuredHeight(), mMarginPaint);
  canvas.save();
  canvas.translate(20, 10);
  super.onDraw(canvas);
  canvas.restore(); 
 }
}
Now For the XML Layout you need to add the following:


And then create an XML to show the Custom TextView you have just created:


And write the Main Activity:
Add The Activity Class for the Main XML:
public class TestingActivity extends Activity {
    @Override
    public void onCreate(Bundle savedInstanceState) {
        super.onCreate(savedInstanceState);
        setContentView(R.layout.main);
        ListView appointmentHistory = (ListView) findViewById(R.id.chu);
        ArrayList< Map< String,String > > appntmntHistoryList = new ArrayList< Map  >();
        Map  mpStr = new HashMap < String, String >();
        mpStr.put("date", "20/10/08");
        mpStr.put("amount", "200");
        appntmntHistoryList.add(mpStr);
        mpStr = new HashMap < String, String >();
        
        mpStr.put("date", "12/05/11");
        mpStr.put("amount", "45");
        appntmntHistoryList.add(mpStr);
        
        SimpleAdapter adapter = new SimpleAdapter(this,appntmntHistoryList,R.layout.list_items,new String[] {"date","amount"},new int[] {R.id.customId,R.id.customId2});
  appointmentHistory.setAdapter(adapter);
        
    }
}
After that, you can see a Dynamic Android Grid Border.

Jun 18, 2011

Sending Email From Android (Code Snippet)

Sending Email from Android via Java Code is not very complex if you configure the Email perfectly in your emulator or device. Keeping that in mind I will give you the code snippet below for sending E-mail:

1. Just create a button in the XML layout file and then paste the code below in your Activity class:
// Comment
public void chooseEmail(View button) {

  Intent emailIntent = new Intent(android.content.Intent.ACTION_SEND);
  emailIntent.setType("plain/text");
  startActivity(Intent.createChooser(emailIntent, getResources().getString(R.string.chooser)));

 }

NetBeans Android Plugin

First go to this URL... http://kenai.com/projects/nbandroid/downloads... and from there you can download the required NetBeans Android Compatible plugin. And install straightaway. I will show you step by step installation of that plugin later.

Sending SMS code snippet of Android

Sending SMS from Android is very simple. I will not go into details regarding sending SMS. Just trying to show you the code.
private void sendSMS(String phoneNumber, String message) {
      String SENT = "SMS_SENT";
       String DELIVERED = "SMS_DELIVERED";
       PendingIntent sentPI = PendingIntent.getBroadcast(this, 0,new Intent(SENT), 0);
       PendingIntent deliveredPI = PendingIntent.getBroadcast(this, 0,new Intent(DELIVERED), 0);
      
       registerReceiver(new BroadcastReceiver(){
                 @Override
                 public void onReceive(Context arg0, Intent arg1) {
                        switch (getResultCode()){
                                  case Activity.RESULT_OK:
         Toast.makeText(getBaseContext(), "SMS sent",
           Toast.LENGTH_SHORT).show();
         break;
        case SmsManager.RESULT_ERROR_GENERIC_FAILURE:
         Toast.makeText(getBaseContext(), "Generic failure",
           Toast.LENGTH_SHORT).show();
         break;
        case SmsManager.RESULT_ERROR_NO_SERVICE:
         Toast.makeText(getBaseContext(), "No service",
           Toast.LENGTH_SHORT).show();
         break;
        case SmsManager.RESULT_ERROR_NULL_PDU:
         Toast.makeText(getBaseContext(), "Null PDU",
           Toast.LENGTH_SHORT).show();
         break;
        case SmsManager.RESULT_ERROR_RADIO_OFF:
         Toast.makeText(getBaseContext(), "Radio off",
           Toast.LENGTH_SHORT).show();
         break;
                        }
       }, new IntentFilter(SENT));

      registerReceiver(new BroadcastReceiver(){
   @Override
   public void onReceive(Context arg0, Intent arg1) {
    switch (getResultCode())
    {
        case Activity.RESULT_OK:
         Toast.makeText(getBaseContext(), "SMS delivered",
           Toast.LENGTH_SHORT).show();
         break;
        case Activity.RESULT_CANCELED:
         Toast.makeText(getBaseContext(), "SMS not delivered",
           Toast.LENGTH_SHORT).show();
         break;        
    }
   }
        }, new IntentFilter(DELIVERED));       
        SmsManager sms = SmsManager.getDefault();
        sms.sendTextMessage(phoneNumber, null, message, sentPI, deliveredPI);  
}

Jun 17, 2011

How to create Apk

How to create apk is the last thing you need after creating your Android application successfully. If you need to know the details view of how all the files are building by executing the apk installation then you can have a look at this. I will give a quick look of creating an apk file. I will only describe the two things that you have two options, whether you need to create an unsigned APK file or signed APK file. I am using here Eclipse Helios IDE. I can also give example of creating APK file from NetBeans IDE.  Whatever the thing is now I will show you step by step procedure of creating a .apk file for the Android OS-supported device that you can check from any Android OS-Supported device.

  1. Right-Click on your project node (Obviously your Android Project should be Right-Clicked).
  2. Go to Android Tools from the Context Menu appeared from the Right-Click.
  3. There would be many options like New Test Project, New Resource File, Export Signed Application Package,  Export Unsigned Application Package, Display dex bytecode, Rename Application Project and Fix Project Properties.
  4. So if you want to create an unsigned apk file then just click and it will be created straight-away. Guess why I have told you creating unsigned apk file before the signed apk because it is very straight forward but there is some problem. We will dig into that later when we will be discussing about the Google MapView problem.
  5. So if you want to create a signed apk file then you have to create a keystore (creating keystore is also very simple, just there would be an option available in Eclipse where you would be asking to give a desired name and password and your keystore will be created), an alias, and then you need to give the details like your name, validity years, organizational unit, organization, state, country and so on. So there are actually two way to create this signed apk file's keystore and alias. From command line and from Eclipse

Jun 16, 2011

Android Tutorial

Android is one of the most popular mobile OS in the market for SmartPhone so far. Its popularity is increasing day by day. One of the significant reason that is creating this kind of craze is for the integration of Java and the Open-Handset Alliance. I will not go to the "helloworld" example of Android. Because you would easily get that example in http://developer.android.com/resources/tutorials/hello-world.html... I will show you developing a complete Application.  Suppose you have the basic understanding of Android SDK and Development (I assume that you have gone through the Android developer website of Google as you can find the basic tutorials over there.) I want to start with an assignment like, I have to create a ListView having text and image altogether. And along with the text there would be something like notes below the main text.

Jan 26, 2011

Struts2 Tutorial

Struts2 is an  Model-View-Controller or more popularly known as MVC Framework. It is totally different than the earlier Struts1 MVC Framework. The Struts2 has the annotation based implementation as well as the earlier XML based configuration. First of all I am going to explain the annotation based configuration and later on along with that I will also demonstrate the XML based configuration as well.