Here I am going to show you how to connect and post to facebook wall by android code. First of all just go to https://github.com/facebook/facebook-android-sdk and click the downloads button to download facebook android sdk. A zipped version will be downloaded within no time. Now open Eclipse IDE to follow the steps below:
Create a new project as Android for the Facebook SDK to add this as a library later. (File > New > Android Project)
Then just click the "Create project from existing source" and then import the facebook folder or type that location in the location textbox. And after that select the Target Name (Such as Android 2.2). And then click finish.
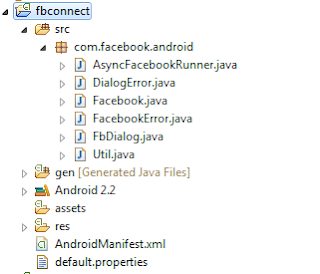
After that you can in your "Package Explorer" something like this. And by expanding the "src" nodes you can see that there are "java" classes available from the facebook sdk.
After that, you need to create an Application (Android Project). Here you can test the whole process of facebook connectivity from Android device or Emulator to be more specific. (File > New > Android Proect) or just click the first icon below the "File" menu.
Complete your project creation like this:
After that from the newly created Project go to the src and create a new Java Class under "com.fbtest.app" package named "FacebookActivity".
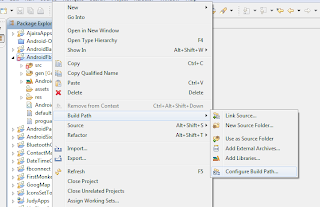
Now you have two Project. The Facebook sdk project is going to be made a library. So for that just do this step by step.
You have to export the application as a JAR file to use in the next Application you have just created.
Do this as I have depicted the procedure like the screen-shots.
No need to add the files shown in the right pane.
Do this same as the screen-shot instructed.
Complete this like this.
Now for the new application you have to do these:
After doing same as like those above picture your project will be ready for Facebook Application integration.
So open your "FacebookActivity" class and add the following lines:
Don't forget to fix imports. The add the MainActivity from where you will call the "FacebookActivity" class.
Put the hash key generated after providing password for the keystore in the Facebook Apps hash key textfield. So use this cygwin if your OS is windows for generating facebook android hash key. Otherwise if your OS is linux you can easily generate the facebook android hash key from terminal.
And run the Android Application in emulator or create an APK and install to your favorite device. You have to allow access for that particular Facebook Apps.
Create a new project as Android for the Facebook SDK to add this as a library later. (File > New > Android Project)
Then just click the "Create project from existing source" and then import the facebook folder or type that location in the location textbox. And after that select the Target Name (Such as Android 2.2). And then click finish.
After that you can in your "Package Explorer" something like this. And by expanding the "src" nodes you can see that there are "java" classes available from the facebook sdk.
After that, you need to create an Application (Android Project). Here you can test the whole process of facebook connectivity from Android device or Emulator to be more specific. (File > New > Android Proect) or just click the first icon below the "File" menu.
Complete your project creation like this:
After that from the newly created Project go to the src and create a new Java Class under "com.fbtest.app" package named "FacebookActivity".
Now you have two Project. The Facebook sdk project is going to be made a library. So for that just do this step by step.
You have to export the application as a JAR file to use in the next Application you have just created.
Do this as I have depicted the procedure like the screen-shots.
No need to add the files shown in the right pane.
Do this same as the screen-shot instructed.
Complete this like this.
Now for the new application you have to do these:
After doing same as like those above picture your project will be ready for Facebook Application integration.
So open your "FacebookActivity" class and add the following lines:
public abstract class FacebookActivity extends Activity {
    public static final String TAG = "FACEBOOK";
    private Facebook mFacebook;
    public static final String APP_ID = "71395118351"; //the API Key for your Facebook APPs
    private AsyncFacebookRunner mAsyncRunner;
    private static final String[] PERMS = new String[] { "publish_stream" };
    private SharedPreferences sharedPrefs;
    private Context mContext;

    private TextView username;
    private ProgressBar pb;

    public void setConnection() {
            mContext = this;
            mFacebook = new Facebook(APP_ID);
            mAsyncRunner = new AsyncFacebookRunner(mFacebook);
    }

    public void getID(TextView txtUserName, ProgressBar progbar) {
            username = txtUserName;
            pb = progbar;
            if (isSession()) {
                    Log.d(TAG, "sessionValid");
                    mAsyncRunner.request("me", new IDRequestListener());
            } else {
                    // no logged in, so relogin
                    Log.d(TAG, "sessionNOTValid, relogin");
                    mFacebook.authorize(this, PERMS, new LoginDialogListener());
            }
    }

    public boolean isSession() {
            sharedPrefs = PreferenceManager.getDefaultSharedPreferences(mContext);
            String access_token = sharedPrefs.getString("access_token", "x");
            Long expires = sharedPrefs.getLong("access_expires", -1);
            Log.d(TAG, access_token);

            if (access_token != null && expires != -1) {
                    mFacebook.setAccessToken(access_token);
                    mFacebook.setAccessExpires(expires);
            }
            return mFacebook.isSessionValid();
    }

    private class LoginDialogListener implements DialogListener {

            @Override
            public void onComplete(Bundle values) {
                    Log.d(TAG, "LoginONComplete");
                    String token = mFacebook.getAccessToken();
                    long token_expires = mFacebook.getAccessExpires();
                    Log.d(TAG, "AccessToken: " + token);
                    Log.d(TAG, "AccessExpires: " + token_expires);
                    sharedPrefs = PreferenceManager
                                    .getDefaultSharedPreferences(mContext);
                    sharedPrefs.edit().putLong("access_expires", token_expires)
                                    .commit();
                    sharedPrefs.edit().putString("access_token", token).commit();
                    mAsyncRunner.request("me", new IDRequestListener());
            }

            @Override
            public void onFacebookError(FacebookError e) {
                    Log.d(TAG, "FacebookError: " + e.getMessage());
            }

            @Override
            public void onError(DialogError e) {
                    Log.d(TAG, "Error: " + e.getMessage());
            }

            @Override
            public void onCancel() {
                    Log.d(TAG, "OnCancel");
            }
    }

    private class IDRequestListener implements RequestListener {

            @Override
            public void onComplete(String response, Object state) {
                    try {
                            Log.d(TAG, "IDRequestONComplete");
                            Log.d(TAG, "Response: " + response.toString());
                            JSONObject json = Util.parseJson(response);

                            final String id = json.getString("id");
                            final String name = json.getString("name");
                            FacebookActivity.this.runOnUiThread(new Runnable() {
                                    public void run() {
                                            username.setText("Welcome: " + name+"\n ID: "+id);
                                            pb.setVisibility(ProgressBar.GONE);

                                    }
                            });
                    } catch (JSONException e) {
                            Log.d(TAG, "JSONException: " + e.getMessage());
                    } catch (FacebookError e) {
                            Log.d(TAG, "FacebookError: " + e.getMessage());
                    }
            }

            @Override
            public void onIOException(IOException e, Object state) {
                    Log.d(TAG, "IOException: " + e.getMessage());
            }

            @Override
            public void onFileNotFoundException(FileNotFoundException e,
                            Object state) {
                    Log.d(TAG, "FileNotFoundException: " + e.getMessage());
            }

            @Override
            public void onMalformedURLException(MalformedURLException e,
                            Object state) {
                    Log.d(TAG, "MalformedURLException: " + e.getMessage());
            }

            @Override
            public void onFacebookError(FacebookError e, Object state) {
                    Log.d(TAG, "FacebookError: " + e.getMessage());
            }

    }

    @Override
    protected void onActivityResult(int requestCode, int resultCode, Intent data) {
            mFacebook.authorizeCallback(requestCode, resultCode, data);
    }

    public void postOnWall(String msg) {
        Log.d("Tests graph API %%%%%$$$$%%%", msg);
         try {
                String response = mFacebook.request("me");
                Bundle parameters = new Bundle();
                parameters.putString("message", msg);
                parameters.putString("description", "test test test");
                response = mFacebook.request("me/feed", parameters,
                        "POST");
                Log.d("Tests", "got response: " + response);
                if (response == null || response.equals("") ||
                        response.equals("false")) {
                   Log.v("Error", "Blank response");
                }
         } catch(Exception e) {
             e.printStackTrace();
         }
    }
}
Don't forget to fix imports. The add the MainActivity from where you will call the "FacebookActivity" class.
public class MainActivity extends FacebookActivity {
    /** Called when the activity is first created. */
 private TextView txtUserName;
    private ProgressBar pbLogin;
    private Button btnLogin;
    private Button btnWall;
 @Override
    public void onCreate(Bundle savedInstanceState) {
        super.onCreate(savedInstanceState);
        setContentView(R.layout.main);

        txtUserName = (TextView) findViewById(R.id.textFacebook);
        pbLogin = (ProgressBar) findViewById(R.id.progressLogin);
        btnLogin = (Button) findViewById(R.id.buttonLogin);
        btnWall = (Button) findViewById(R.id.buttonWall);

  btnLogin.setOnClickListener(listener);
  btnWall.setOnClickListener(listener1);
    }

 OnClickListener listener = new OnClickListener(){

  @Override
  public void onClick(View v) {   //
   pbLogin.setVisibility(ProgressBar.VISIBLE);
         setConnection();
         getID(txtUserName, pbLogin);
  }

 };

 OnClickListener listener1 = new OnClickListener(){

  @Override
  public void onClick(View v) {   //
   postOnWall("Testing from Android");
  }

 };

}
For your Facebook Apps just create the Apps from the site and follow the steps depicted below:Put the hash key generated after providing password for the keystore in the Facebook Apps hash key textfield. So use this cygwin if your OS is windows for generating facebook android hash key. Otherwise if your OS is linux you can easily generate the facebook android hash key from terminal.
And run the Android Application in emulator or create an APK and install to your favorite device. You have to allow access for that particular Facebook Apps.


